How can we help you today?
【通訊】WiFi AP模式 | dual2s-mini | MPY-LLM
簡介:
AP模式(Access Point Mode)即成為一個無線接入點,使其他Wi-Fi設備可以連接並通過該設備進行通信。這種模式適合應用於無線網絡控制、物聯網設備等場景中。以下是AP模式的原理與設定方式:
AP模式的原理
- 無線網絡模式:在AP模式下,dual2s-mini會自成為無線網絡的「熱點」,並提供SSID(服務集標識符)和密碼,以便其他設備可以掃描並連接到它。
- IP分配:當ESP32/ESP8266作為無線接入點時,它會自動分配一個IP地址範圍(通常為
192.168.4.x),並將自己設為網關(默認IP為192.168.4.1)。連接的設備會在此範圍內自動獲得IP地址,形成一個局部網絡。 - 本地通信:一旦設備連接到ESP32/ESP8266的AP網絡,便可以通過這個IP範圍進行通信。這樣ESP32/ESP8266可以充當HTTP伺服器或WebSocket伺服器來處理請求,例如從網頁端發送命令,控制LED或其他外接設備。
- 安全性:AP模式可以設置Wi-Fi密碼和加密方式(例如WPA2),確保只有授權設備能夠連接。
MPY AP模式基本範例:
1.啟動AP模式
使用 network.WLAN(network.AP_IF) 來啟用AP模式。以下是基本的設置範例:
import network
import socket

# 創建 AP 物件
ap = network.WLAN(network.AP_IF)
ap.active(True)  # 啟用 AP 模式

# 設定 AP 的 SSID 和密碼
ap.config(essid="dual2s_AP", password="12345678", authmode=3, channel=6, max_clients=5, hidden=False)

# 設定靜態 IP 位址
new_ip = "192.168.10.1"  # 新的靜態 IP 位址
netmask = "255.255.255.0"  # 子網掩碼
gateway = "192.168.10.1"   # 閘道器
dns = "8.8.8.8"            # DNS 伺服器
ap.ifconfig((new_ip, netmask, gateway, dns))

# 輸出設定結果
print("SSID:", ap.config("essid"))
print("認證模式:", ap.config("authmode"))
print("頻道:", ap.config("channel"))
print("最大客戶端數量:", ap.config("max_clients"))
print("IP 地址:", ap.ifconfig()[0])
2. 建立簡單的Web伺服器
在AP模式下,dual2s-mini可作為伺服器來處理網頁或其他控制請求。這樣可以使用瀏覽器直接訪問dual2s-mini的IP地址來控制它。
import socket

def serve():
    s = socket.socket(socket.AF_INET, socket.SOCK_STREAM)
    s.bind(('', 80))
    s.listen(5)
    while True:
        conn, addr = s.accept()
        request = conn.recv(1024)
        print('Received request from %s' % str(addr))

        # 簡單的HTML回應
        response = """<!DOCTYPE html>
        <html><body><h1>dual2s-mini AP Mode!</h1></body></html>"""

        conn.send('HTTP/1.1 200 OK\n')
        conn.send('Content-Type: text/html\n')
        conn.send('Connection: close\n\n')
        conn.sendall(response)
        conn.close()

# 啟動伺服器
serve()
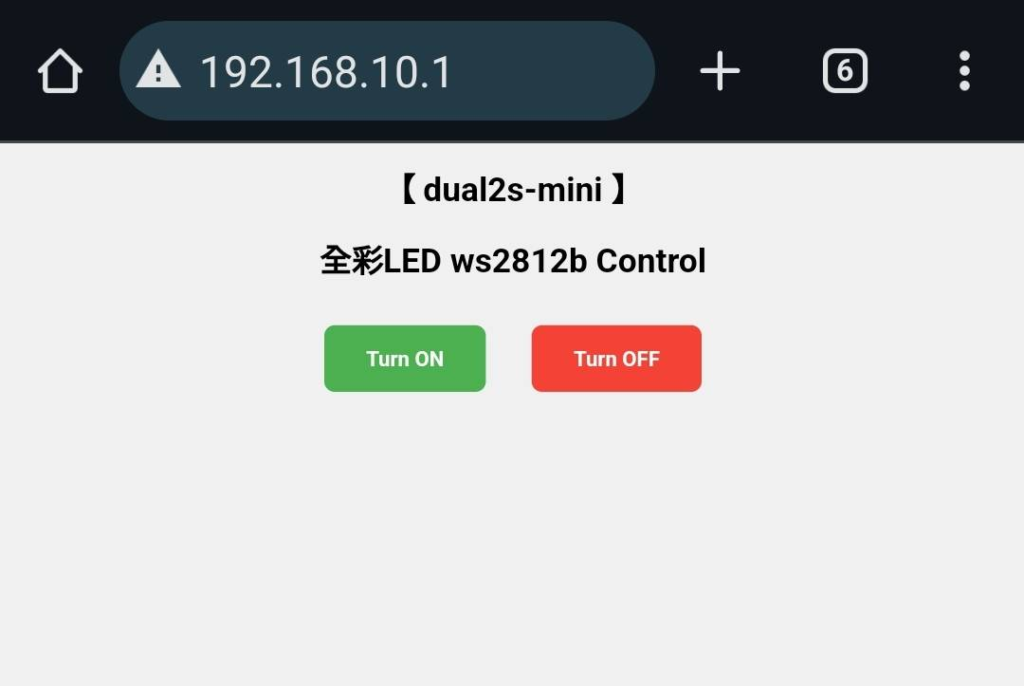
3. 建立控制ws2812b的AP模式

import network
import socket

from machine import Pin
import neopixel

# 創建 AP 物件
ap = network.WLAN(network.AP_IF)
ap.active(True)  # 啟用 AP 模式

# 設定 AP 的 SSID 和密碼
ap.config(essid="dual2s_AP", password="12345678", authmode=3, channel=6, max_clients=5, hidden=False)

# 設定靜態 IP 位址
# new_ip, netmask, gateway, dns
ap.ifconfig(("192.168.10.1", "255.255.255.0", "192.168.10.1", "8.8.8.8"))

# 輸出設定結果
print("SSID:", ap.config("essid"))
print("IP 地址:", ap.ifconfig()[0])

#----------------------------------------------------------------------------------
# HTML頁面內容
html = """
<!DOCTYPE html>
<html>
<head>
    <meta charset="UTF-8">
    <title>【 dual2s-mini 】</title>
    <style>
        body {
            font-family: Arial, sans-serif;
            text-align: center;
            margin: 0;
            padding: 0;
            background-color: #f0f0f0;
        }
        .button {
            display: inline-block;
            margin: 20px;
            padding: 20px 40px;
            font-size: 20px;
            font-weight: bold;
            color: white;
            border: none;
            border-radius: 10px;
            cursor: pointer;
        }
        .on {
            background-color: #4CAF50; /* 綠色 */
        }
        .off {
            background-color: #f44336; /* 紅色 */
        }
        .button:hover {
            opacity: 0.9;
        }
    </style>
</head>
<body>
    <h1>【 dual2s-mini 】</h1>
    <h1>全彩LED ws2812b Control </h1>
    <button class="button on" onclick="sendRequest('/on')">Turn ON</button>
    <button class="button off" onclick="sendRequest('/off')">Turn OFF</button>
    <script>
        function sendRequest(path) {
            fetch(path).then(response => {
                console.log('Request sent to ' + path);
            }).catch(error => {
                console.error('Error:', error);
            });
        }
    </script>
</body>
</html>
"""
#-------------------------------------------------------------------

# 設置WS2812B
led_pin = Pin(2, Pin.OUT)
np = neopixel.NeoPixel(led_pin, 1)  # 假設只有1顆WS2812B LED

def set_led(color):
    """
    控制WS2812B顏色
    :param color: (R, G, B) 顏色值
    """
    np[0] = color
    np.write()
#----------------------------------------------------------------------------------

# 建立HTTP伺服器
def start_server():
    addr = socket.getaddrinfo('0.0.0.0', 80)[0][-1]
    s = socket.socket()
    s.bind(addr)
    s.listen(5)
    print('Listening on', addr)

    while True:
        cl, addr = s.accept()
        print('Client connected from', addr)
        request = cl.recv(1024).decode('utf-8')
        print('Request:', request)

        # 處理GET請求
        if 'GET /on' in request:
            set_led((0, 255, 0))  # 綠色
        elif 'GET /off' in request:
            set_led((0, 0, 0))  # 關閉LED

        # 回傳HTML
        cl.send('HTTP/1.0 200 OK\r\nContent-type: text/html\r\n\r\n')
        cl.send(html)
        cl.close()

# 啟動伺服器
start_server()
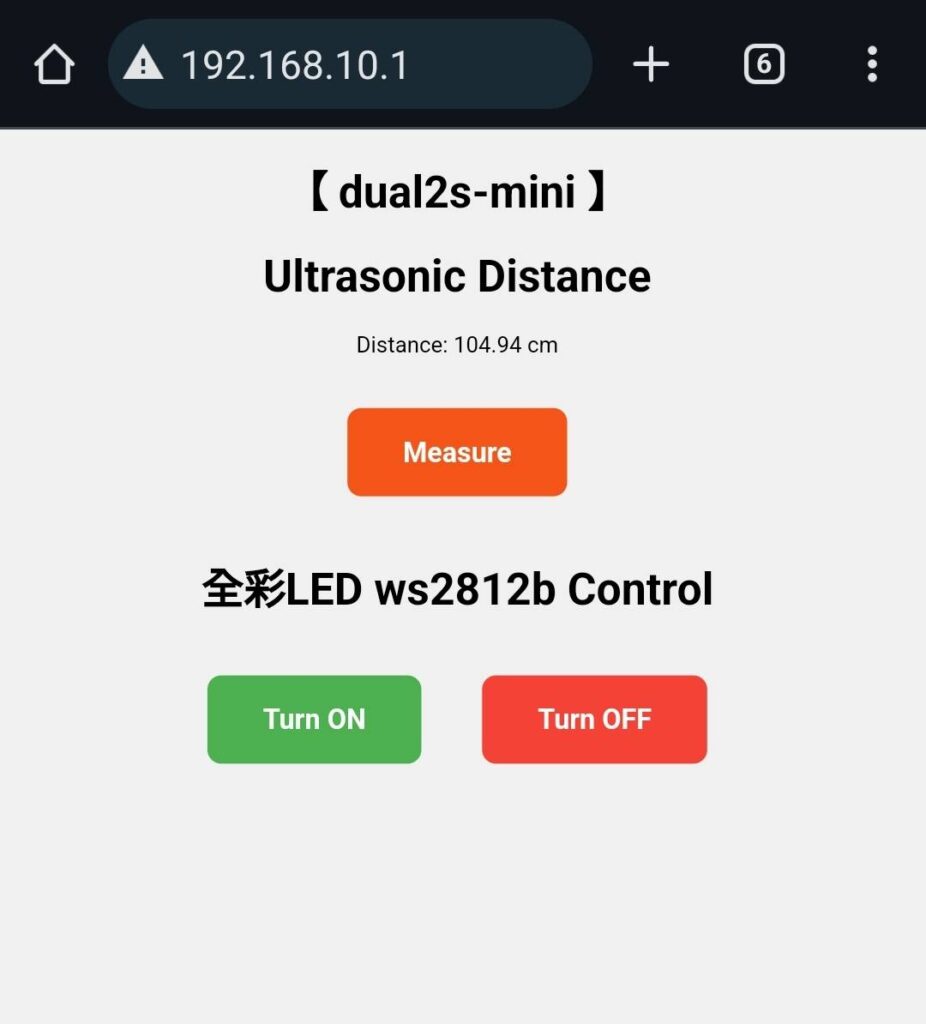
4. Get命令控制超音波與全彩LED:

import network
import socket
import json
import time
from machine import Pin, time_pulse_us
import neopixel

# 創建 AP 物件
ap = network.WLAN(network.AP_IF)
ap.active(True)  # 啟用 AP 模式

# 設定 AP 的 SSID 和密碼
ap.config(essid="dual2s_AP", password="12345678", authmode=3, channel=6, max_clients=5, hidden=False)

# 設定靜態 IP 位址
# new_ip, netmask, gateway, dns
ap.ifconfig(("192.168.10.1", "255.255.255.0", "192.168.10.1", "8.8.8.8"))

# 輸出設定結果
print("SSID:", ap.config("essid"))
print("IP 地址:", ap.ifconfig()[0])

#----------------------------------------------------------------------------------
# HTML頁面內容
html = """
<!DOCTYPE html>
<html>
<head>
    <meta charset="UTF-8">
    <title>【 dual2s-mini 】</title>
    <style>
        body {
            font-family: Arial, sans-serif;
            text-align: center;
            margin: 0;
            padding: 0;
            background-color: #f0f0f0;
        }
        .button {
            display: inline-block;
            margin: 20px;
            padding: 20px 40px;
            font-size: 20px;
            font-weight: bold;
            color: white;
            border: none;
            border-radius: 10px;
            cursor: pointer;
        }
        .on {
            background-color: #4CAF50; /* 綠色 */
        }
        .off {
            background-color: #f44336; /* 紅色 */
        }
        .usc {
            background-color: #f44300; /*  */
        }
        .button:hover {
            opacity: 0.9;
        }
    </style>
</head>
<body>
    <h1>【 dual2s-mini 】</h1>

    <h1>Ultrasonic Distance</h1>
    <p id="distance">Distance: -- cm</p>
    <button class="button usc" onclick="measureDistance()">Measure</button>

    <h1>全彩LED ws2812b Control </h1>
    <button class="button on" onclick="sendRequest('/on')">Turn ON</button>
    <button class="button off" onclick="sendRequest('/off')">Turn OFF</button>
    <script>

        function sendRequest(path) {
            fetch(path).then(response => {
                console.log('Request sent to ' + path);
            }).catch(error => {
                console.error('Error:', error);
            });
        }

        async function measureDistance() {
            const response = await fetch('/measure');
            const data = await response.json();
            const distanceElement = document.getElementById('distance');
            if (data.distance >= 0) {
                distanceElement.textContent = `Distance: ${data.distance} cm`;
            } else {
                distanceElement.textContent = "Distance: Measurement Error";
            }
        }

    </script>
</body>
</html>
"""
#-------------------------------------------------------------------
TRIG = Pin(27, Pin.OUT)
ECHO = Pin(13, Pin.IN)
def measure_distance():
    """
    啟動超聲波模組,測量距離。
    回傳距離(單位:厘米)。
    """
    TRIG.off()
    time.sleep_us(2)
    TRIG.on()
    time.sleep_us(10)
    TRIG.off()

    # 偵測ECHO的高電平時間
    duration = time_pulse_us(ECHO, 1, 30000)  # 最長等待30ms
    if duration < 0:
        return -1  # 超時

    # 計算距離(單位:cm)
    distance = (duration / 2) * 0.0343
    return round(distance, 2)


# 設置WS2812B
led_pin = Pin(2, Pin.OUT)
np = neopixel.NeoPixel(led_pin, 1)  # 假設只有1顆WS2812B LED

def set_led(color):
    """
    控制WS2812B顏色
    :param color: (R, G, B) 顏色值
    """
    np[0] = color
    np.write()
#-------------------------------------------------------------------

# 建立HTTP伺服器
def start_server():
    addr = socket.getaddrinfo('0.0.0.0', 80)[0][-1]
    s = socket.socket()
    s.bind(addr)
    s.listen(5)
    print('Listening on', addr)

    while True:
        cl, addr = s.accept()
        print('Client connected from', addr)
        request = cl.recv(1024).decode('utf-8')
        print('Request:', request)

        # 處理GET請求
        if 'GET /on' in request:
            set_led((0, 255, 0))  # 綠色
            cl.send('HTTP/1.0 200 OK\r\nContent-type: text/html\r\n\r\n')
            cl.send(html)
        elif 'GET /off' in request:
            set_led((0, 0, 0))  # 關閉LED
            cl.send('HTTP/1.0 200 OK\r\nContent-type: text/html\r\n\r\n')
            cl.send(html)
        elif 'GET /measure' in request:
            distance = measure_distance()
            response = json.dumps({'distance': distance})
            print('nick : ' + response)
            cl.send('HTTP/1.1 200 OK\r\nContent-Type: application/json\r\n\r\n')
            cl.send(response)
        else:
            cl.send('HTTP/1.0 200 OK\r\nContent-type: text/html\r\n\r\n')
            cl.send(html)


        cl.close()

# 啟動伺服器
start_server()
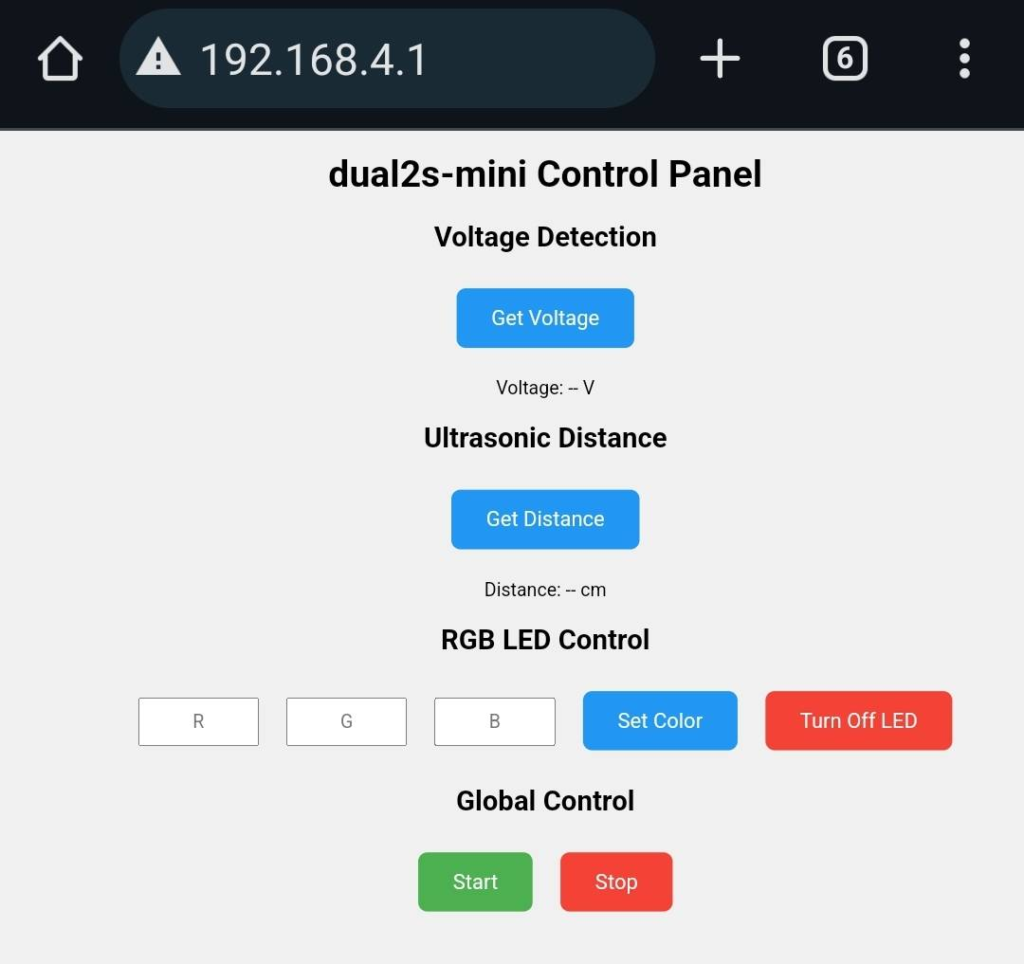
6. 建立控制按鍵
以下是一個完整的MicroPython程式,展示如何在ESP32的AP模式中,建立HTML網頁介面,包含以下功能:
- 按鈕觸發 電壓偵測(GPIO36)。
- 按鈕觸發 超音波模組測距(Trig=GPIO27,Echo=GPIO13)。
- 控制 全彩LED (WS2812B,GPIO2),可透過RGB文字框輸入顏色值,按下按鈕後生效。
- 啟動與停止按鈕,控制所有功能。

import network
import socket
from machine import Pin, ADC, time_pulse_us
import neopixel
import time
import json

# 硬體初始化
# 電壓偵測
adc = ADC(Pin(36))
adc.width(ADC.WIDTH_12BIT)  # 設置ADC解析度為12位
adc.atten(ADC.ATTN_11DB)    # 電壓範圍0-3.6V

# 超音波模組
TRIG = Pin(27, Pin.OUT)
ECHO = Pin(13, Pin.IN)

def measure_distance():
    TRIG.off()
    time.sleep_us(2)
    TRIG.on()
    time.sleep_us(10)
    TRIG.off()
    duration = time_pulse_us(ECHO, 1, 30000)
    if duration < 0:
        return -1
    distance = (duration / 2) * 0.0343  # 計算距離 (cm)
    return round(distance, 2)

# 全彩LED
LED_PIN = Pin(2, Pin.OUT)
np = neopixel.NeoPixel(LED_PIN, 1)

def set_led(color):
    np[0] = color
    np.write()

def turn_off_led():
    np[0] = (0, 0, 0)
    np.write()

# WiFi AP模式啟動
SSID = "ESP32_AP"
PASSWORD = "12345678"

ap = network.WLAN(network.AP_IF)
ap.active(True)
ap.config(essid=SSID, password=PASSWORD)
print("AP Mode: {} - {}".format(SSID, ap.ifconfig()[0]))

# HTML頁面
html = """
<!DOCTYPE html>
<html>
<head>
    <title>ESP32 Control Panel</title>
    <style>
        body { font-family: Arial, sans-serif; text-align: center; background-color: #f0f0f0; }
        button { margin: 10px; padding: 15px 30px; font-size: 18px; cursor: pointer; border: none; border-radius: 8px; }
        button.start { background-color: #4CAF50; color: white; }
        button.stop { background-color: #f44336; color: white; }
        button.action { background-color: #2196F3; color: white; }
        input { margin: 10px; padding: 10px; font-size: 16px; width: 80px; text-align: center; }
    </style>
</head>
<body>
    <h1>ESP32 Control Panel</h1>
    <h2>Voltage Detection</h2>
    <button class="action" onclick="fetchData('/voltage')">Get Voltage</button>
    <p id="voltage">Voltage: -- V</p>

    <h2>Ultrasonic Distance</h2>
    <button class="action" onclick="fetchData('/distance')">Get Distance</button>
    <p id="distance">Distance: -- cm</p>

    <h2>RGB LED Control</h2>
    <input type="text" id="r" placeholder="R" maxlength="3">
    <input type="text" id="g" placeholder="G" maxlength="3">
    <input type="text" id="b" placeholder="B" maxlength="3">
    <button class="action" onclick="setColor()">Set Color</button>
    <button class="stop" onclick="fetchData('/led?color=0,0,0')">Turn Off LED</button>

    <h2>Global Control</h2>
    <button class="start" onclick="fetchData('/start')">Start</button>
    <button class="stop" onclick="fetchData('/stop')">Stop</button>

    <script>
        async function fetchData(path) {
            const response = await fetch(path);
            const data = await response.json();
            if (path.includes('/voltage')) {
                document.getElementById('voltage').innerText = `Voltage: ${data.voltage} V`;
            } else if (path.includes('/distance')) {
                document.getElementById('distance').innerText = `Distance: ${data.distance} cm`;
            }
        }

        async function setColor() {
            const r = document.getElementById('r').value || 0;
            const g = document.getElementById('g').value || 0;
            const b = document.getElementById('b').value || 0;
            await fetch(`/led?color=${r},${g},${b}`);
        }
    </script>
</body>
</html>
"""

# 啟動HTTP伺服器
def start_server():
    addr = socket.getaddrinfo('0.0.0.0', 80)[0][-1]
    s = socket.socket()
    s.bind(addr)
    s.listen(5)
    print('Listening on', addr)

    running = True

    while running:
        cl, addr = s.accept()
        request = cl.recv(1024).decode('utf-8')
        print("Request:", request)

        # 分析請求
        if 'GET /voltage' in request:
            voltage = round(adc.read() * 3.6 / 4095, 2)
            response = json.dumps({'voltage': voltage})
            cl.send('HTTP/1.1 200 OK\r\nContent-Type: application/json\r\n\r\n' + response)

        elif 'GET /distance' in request:
            distance = measure_distance()
            response = json.dumps({'distance': distance})
            cl.send('HTTP/1.1 200 OK\r\nContent-Type: application/json\r\n\r\n' + response)

        elif 'GET /led' in request:
            try:
                color_str = request.split('GET /led?color=')[1].split(' ')[0]
                r, g, b = map(int, color_str.split(','))
                set_led((r, g, b))
            except:
                turn_off_led()
            cl.send('HTTP/1.1 200 OK\r\nContent-Type: text/plain\r\n\r\nOK')

        elif 'GET /start' in request:
            running = True
            cl.send('HTTP/1.1 200 OK\r\nContent-Type: text/plain\r\n\r\nStarted')

        elif 'GET /stop' in request:
            running = False
            turn_off_led()
            cl.send('HTTP/1.1 200 OK\r\nContent-Type: text/plain\r\n\r\nStopped')

        else:
            cl.send('HTTP/1.1 200 OK\r\nContent-Type: text/html\r\n\r\n' + html)

        cl.close()

# 啟動伺服器
start_server()
